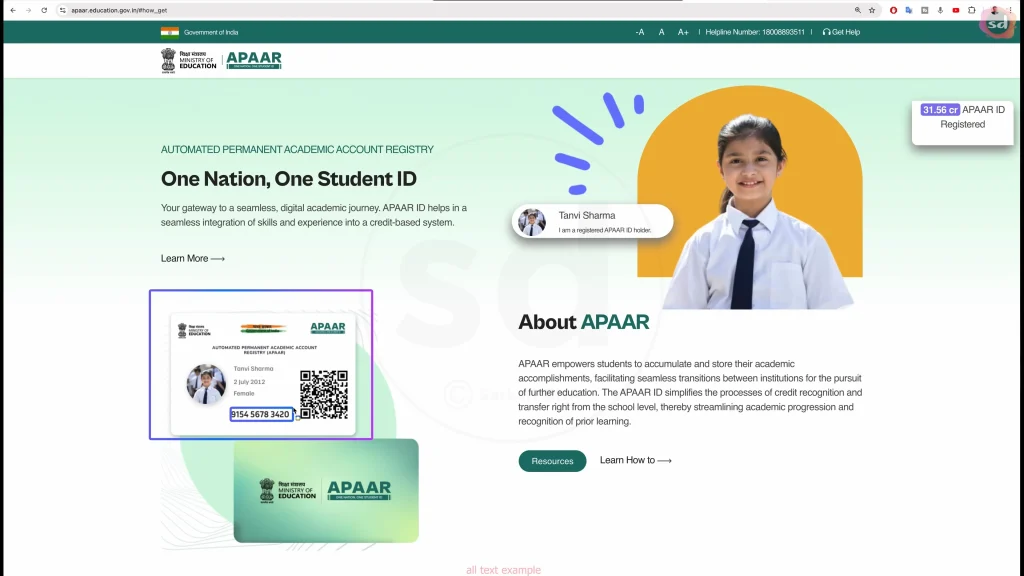
The APAAR ID consent form is a mandatory document required for generating a student’s APAAR ID. It confirms that a parent or legal guardian has granted permission for the student’s academic data to be recorded in the APAAR (Automated Permanent Academic Account Registry) system.
This guide explains the importance of the consent form, along with step-by-step instructions to download, fill, and submit it correctly.
Sections Covered
- Official Portal
- Apaar Login & Registration
- APAAR ID Download
- Consent Form Process
Important Notice: The consent form includes legally binding information related to data privacy. Parents and guardians should read all declarations carefully before signing. Always download the form from official sources only.
What Is the APAAR ID Consent Form?
The APAAR ID consent form is an official declaration signed by a parent or legal guardian, allowing the creation of an APAAR ID for a student. It serves the following purposes:
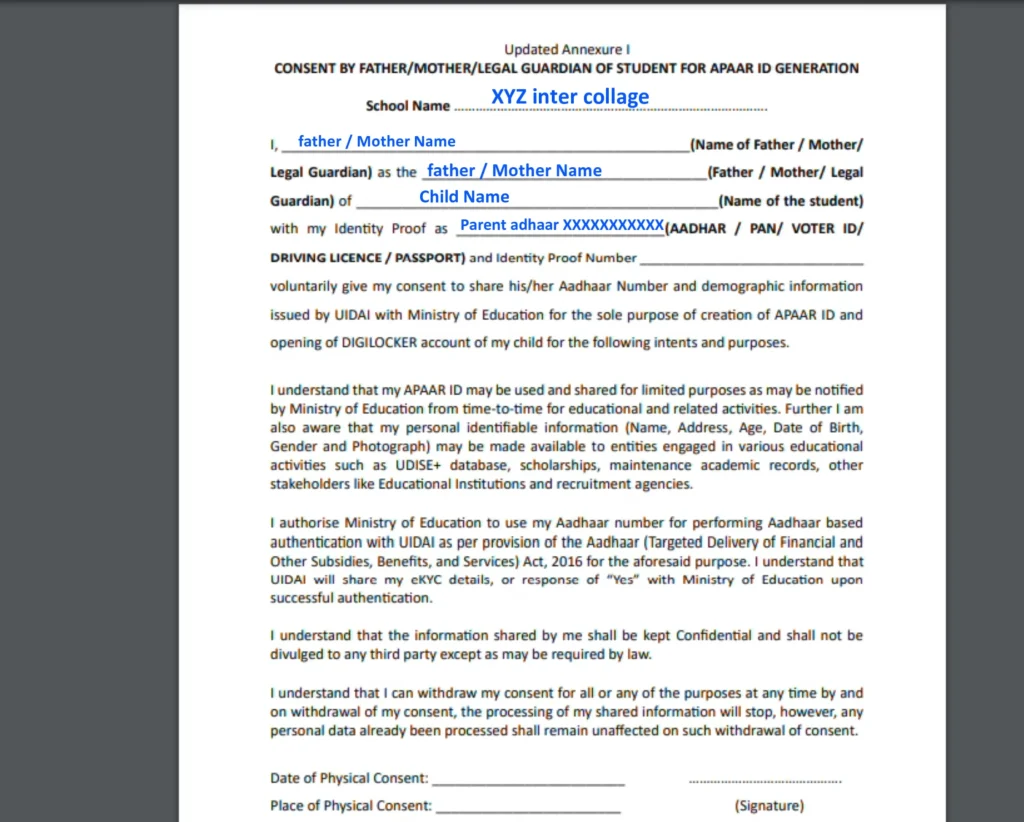
- Confirms parental approval for APAAR ID creation
- Acknowledges understanding of how student data will be stored and used
- Grants permission to link academic records with the APAAR ID
- Ensures awareness of data privacy and security safeguards
This form is mandatory for students below 18 years of age, as minors cannot legally provide consent themselves.
For students aged 18 years or above, self-consent is generally acceptable, though specific institutional rules may apply.
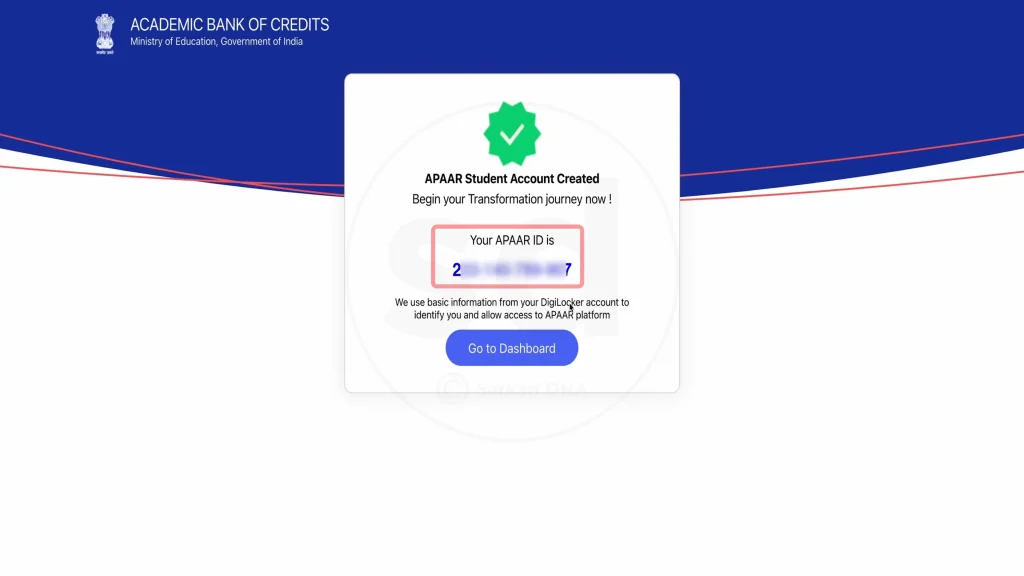
Once the consent form is approved, the APAAR ID certificate can be generated and accessed.
APAAR ID Consent Form – Key Details
| Aspect | Information |
| Document Name | APAAR ID Parent/Guardian Consent Form |
| Mandatory For | Students below 18 years |
| Who Signs | Parent or Legal Guardian |
| Available Formats | PDF, DOCX |
| Languages | English, Hindi & regional languages |
| File Size | Around 300–400 KB |
| Submission Mode | Through school/institution |
| Validity | Till student turns 18 or completes studies |
| Official Source | apaar.education.gov.in |
How to Download the APAAR ID Consent Form?
You can obtain the consent form using any of the methods below:
Method 1: Direct Official Download
- Download Apaar ID consent form from the official APAAR link
- The file downloads in DOCX format
- Open it using Microsoft Word or any compatible editor
- Save it for completion
Method 2: Through the APAAR Official Portal
- Visit apaar.education.gov.in
- Go to the Downloads / Forms section
- Select APAAR ID Parental Consent Form
- Download and save the file
Method 3: Through the School
Most schools distribute the consent form during APAAR registration. Parents can:
- Collect it from the class teacher
- Contact the school office
- Check email or student communication files
- Request a printed copy
Always ensure you are using the latest version of the form, as updates may include revised data privacy policies.
How to Fill the APAAR ID Consent Form Correctly?
Carefully complete all sections to avoid rejection or delays.
Step 1: Student Details
Enter the student’s information exactly as per school records:
- Full name
- Date of birth
- Gender
- Class / Grade
- School name and address
- UDISE code (available from school administration)
Step 2: Parent / Guardian Details
Provide accurate guardian information:
- Full name
- Relationship to student
- Mobile number
- Email address (if available)
- Complete residential address
Step 3: Review Consent Declarations
Read all statements explaining:
- Data usage purpose
- Information stored in APAAR
- Access permissions
- Parent/guardian rights
Step 4: Signature & Date
- Sign in the designated space
- Write your full name clearly
- Add the current date
- Reconfirm your mobile number
Important: Only parents or legal guardians may sign the form. Signatures from students, siblings, or relatives are not valid. Schools may verify signatures against existing records.
How to Submit the APAAR ID Consent Form?
Physical Submission (Most Common)
- Print the completed form on A4 paper
- Ensure clarity and original ink signature
- Submit it to the class teacher or the school office
- Request acknowledgement if available
- Keep a photocopy for records
Digital Submission (If Allowed by School)
Some institutions accept digital copies:
- Fill the form digitally
- Add a digital or scanned signature
- Email the form to the school’s official email ID
- Mention student’s name and class in the subject line
- Save the sent email for reference
📌 Always confirm your school’s preferred submission method.
After Submitting the Consent Form
Once submitted:
- School verifies the form
- Data is uploaded to the APAAR system
- APAAR ID is generated
- Parent receives confirmation via SMS
- APAAR ID appears in DigiLocker
Processing Time:
Usually 3–7 working days after submission.
After ID creation, parents and students can log in to the APAAR portal and manage academic records securely.
Additional FAQs – APAAR ID Consent Form
Can schools create an APAAR ID without a consent form?
No. For students below 18 years, schools are legally required to collect a signed consent form before initiating APAAR ID creation.
Is Aadhaar mandatory while filling the consent form?
The consent form itself does not require Aadhaar details, but APAAR ID creation is linked with Aadhaar verification during the registration process.
Can the consent form be filled online completely?
In most cases, the form must be printed, signed, and submitted physically. Some schools may allow digitally signed forms, depending on their internal policy.